Rendering Prisma Queries With React Table: The Low-Code Way


React Table, or more precisely, TanStack Table is a headless table UI library. If you're new to this kind of product, you'll probably ask, "What the heck is headless UI"? Isn't UI all about the head, after all? It all starts to make sense until you try something like React Table.
For two reasons, tables are one of the nastiest things to build in web UI. First, they are difficult to render well, considering the amount of data they can hold, the interactions they allow, and the need to adapt to different screen sizes. Second, their state is complex: sorting, filtering, pagination, grouping, etc. React Table's philosophy is to solve the second problem well and leave the first entirely to you. It manages the state and logic of a table but doesn't touch the rendering part because:
Building UI is a very branded and custom experience, even if that means choosing a design system or adhering to a design spec. - tanstack.com
Tables are most commonly used to render database query results — in modern times, the output of an ORM. In this post, I'll introduce a way of connecting Prisma - the most popular TypeScript ORM, to React Table, with the help of React Query and ZenStack. You'll be amazed by how little code you need to write to render a full-fledged table UI.
A full-stack setup
We need a full-stack application to query a database and render the UI. In this example, I'll use Next.js as the framework, although the approach can be applied to other similar frameworks (like Nuxt, SvelteKit, etc.), or to an application with decoupled front-end and back-end.
We can easily create a new project with npx create-next-app. After that, we need to install several dependencies:
- Prisma - the ORM
- ZenStack - a full-stack toolkit built above Prisma
- React Query - the data-fetching library
- React Table - the headless table library
We'll also use the legendary "North Wind" trading dataset (created by Microsoft many, many years ago) to feed our database. Here's its ERD:
A Prisma schema file is authored to reflect this database structure.
The "free lunch" API
SQL databases are not meant to be consumed from the frontend. You need an API to mediate. You can build such an API in many ways, but here we'll use ZenStack to "unbuild" it. ZenStack is a full-stack toolkit built above Prisma, and one of the cool things it does is to automagically derive a backend API from the schema.
Setting ZenStack up is straightforward:
-
Run
npx zenstack initto prep the project. It copies theschema.prismafile intoschema.zmodel- which is the schema file used by ZenStack. ZModel is a superset of Prisma schema. -
Whenever you make changes to
schema.zmodel, runnpx zenstack generateto regenerate the Prisma schema andPrismaClient.
ZenStack can provide a full set of CRUD API with Next.js in a few lines of code:
import { prisma } from '@/server/db';
import { NextRequestHandler } from '@zenstackhq/server/next';

const handler = NextRequestHandler({
  getPrisma: () => prisma,
  useAppDir: true,
});

export {
  handler as DELETE,
  handler as GET,
  handler as PATCH,
  handler as POST,
  handler as PUT,
};
Now you have a set of APIs mounted at /api/model that mirrors PrismaClient:
- GET
/api/model/order/findMany?q=... - GET
/api/model/order/count?q=... - PUT
/api/model/order/update - ...
The query parameters and body also follow the corresponding PrismaClient method parameters.
I know a big 🚨 NO THIS IS NOT SECURE 🚨 is flashing in your mind. Hold on, we'll get to that later.
The "free lunch" hooks
Having a free API is cool, but writing fetch to call it is cumbersome. How about some free query hooks? Yes, add the @zenstackhq/tanstack-query plugin to the ZModel schema, and you'll have a set of fully typed React Query hooks generated for each model:
plugin hooks {
  provider = '@zenstackhq/tanstack-query'
  target = 'react'
  output = 'src/hooks'
}
The hooks call into the APIs we installed in the previous section, and they also precisely mirror PrismaClient's signature:
import { useFindManyOrder } from '@/hooks/order';

// data is typed as `(Order & { details: OrderDetail[]; customer: Customer })[]`
const { data, isLoading, error } = useFindManyOrder({
  where: { ... },
  orderBy: { ... },
  include: { details: true, customer: true }
});
Please note that although React Query and React Table are both from TanStack, you don't have to use them together. React Table is agnostic to the data fetching mechanism. They just happen to play very well together.
Finally, let's build the table
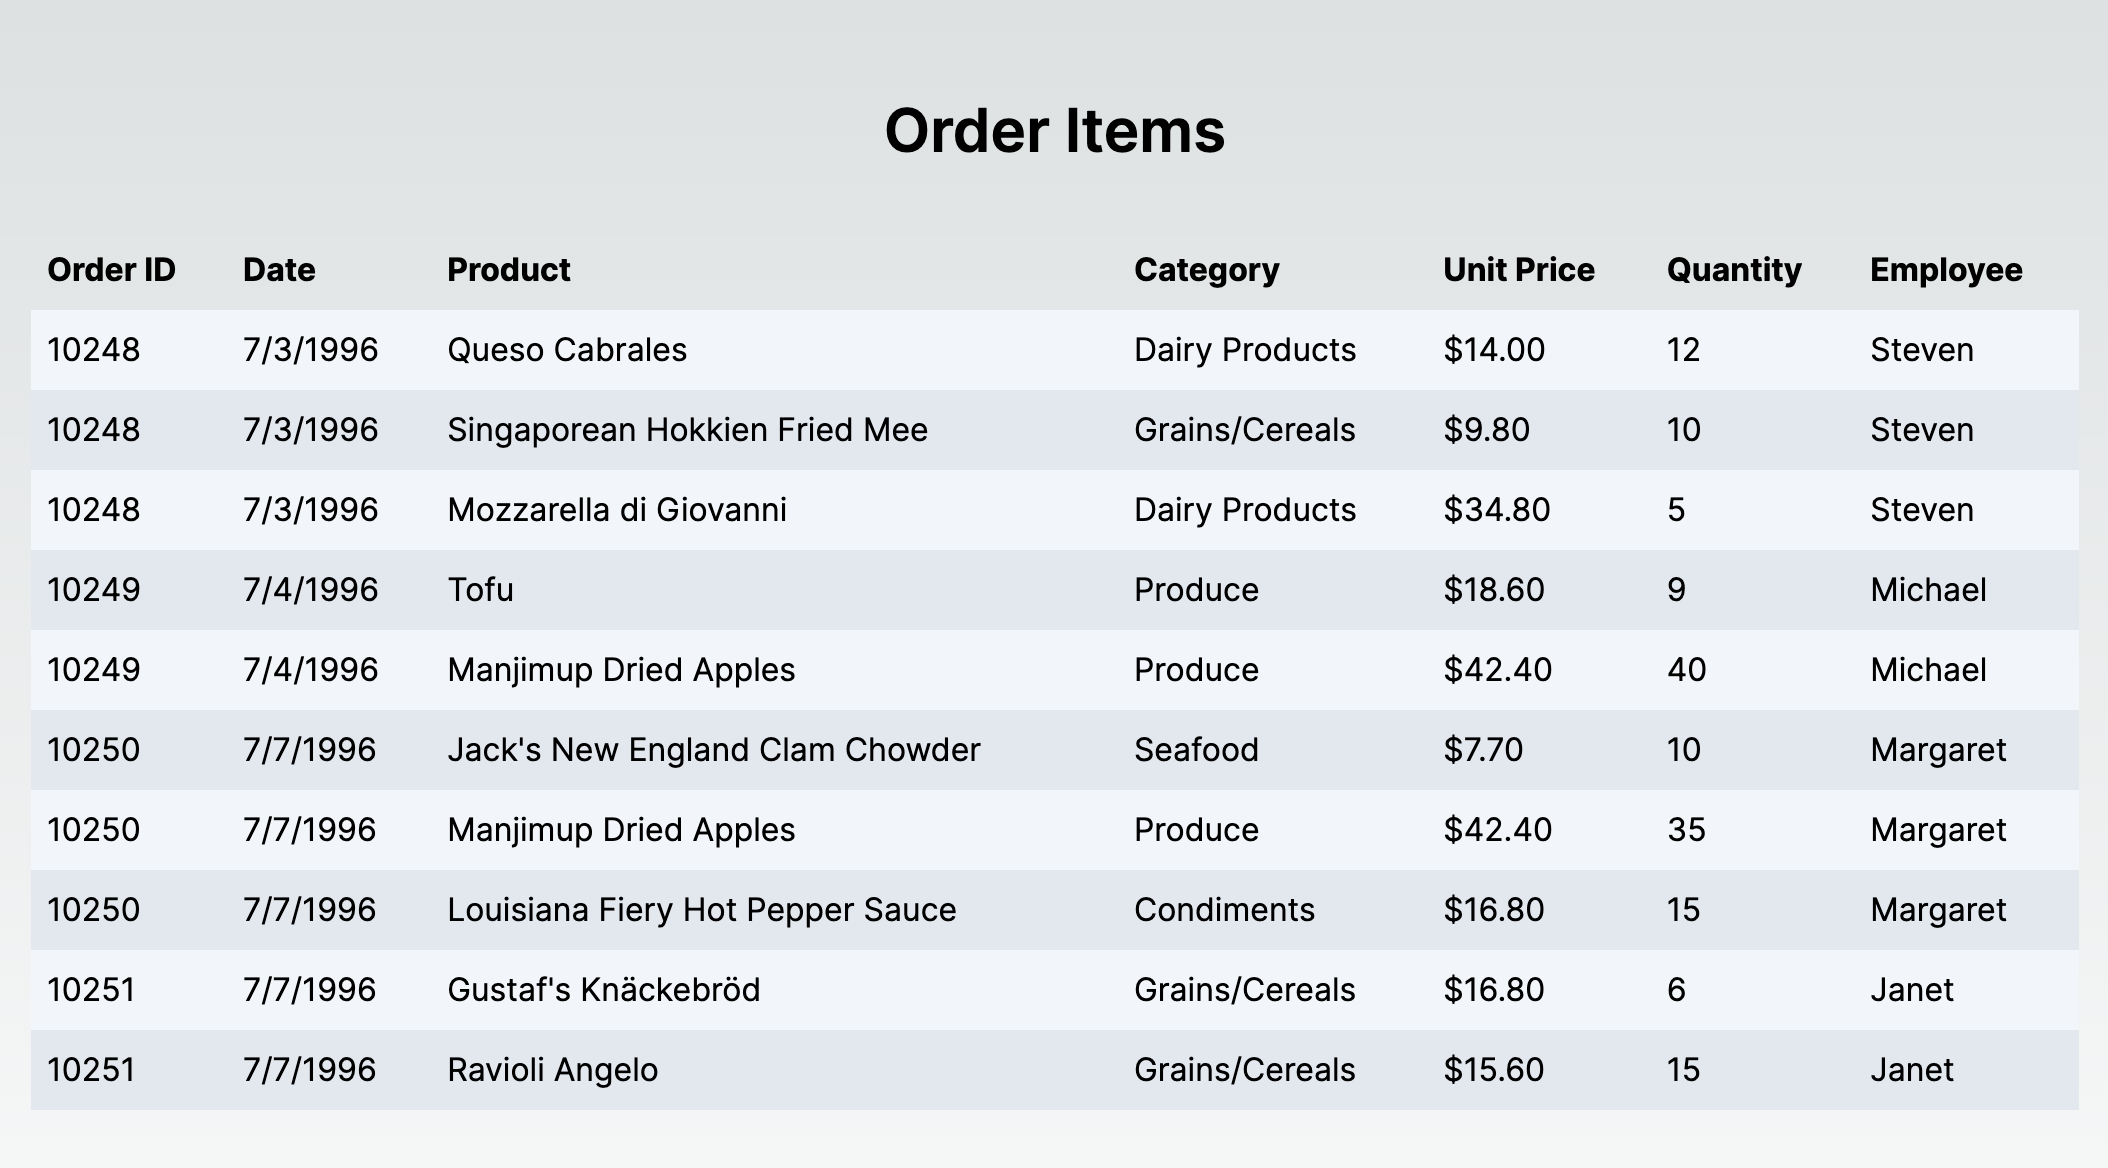
Creating a basic table is straightforward, You define the columns and then initialize a table instance with data. We'll see how to do it by building a table to display order details.
// the relation fields included when querying `OrderDetail`
const queryInclude = {
  include: {
    order: { include: { employee: true } },
    product: { include: { category: true } },
  },
} satisfies Prisma.OrderDetailFindManyArgs;

// create a column helper to simplify the column definition
// The `Prisma.OrderDetailGetPayload<typeof queryInclude>` type gives us
// the shape of the query result
const columnHelper =
  createColumnHelper<Prisma.OrderDetailGetPayload<typeof queryInclude>>();

const columns = [
  columnHelper.accessor('order.id', { header: () => <span>Order ID</span> }),

  columnHelper.accessor('order.orderDate', {
      cell: (info) => info.getValue()?.toLocaleDateString(),
      header: () => <span>Date</span>,
  }),

  // other columns ...

  columnHelper.accessor('order.employee.firstName', {
      header: () => <span>Employee</span>,
  }),
];

export const OrderDetails = () => {
  // fetch data with query hooks
  const { data } = useFindManyOrderDetail({
    ...queryInclude,
  });

  // create a table instance
  const table = useReactTable({
    data: orders ?? [],
    columns,
    getCoreRowModel: getCoreRowModel(),
  });
}
We can then render the table with some basic tsx:
export const OrderDetails = () => {
  ...

  return (
    <table>
      <thead>
        {table.getHeaderGroups().map((headerGroup) => (
          <tr key={headerGroup.id}>
            {headerGroup.headers.map((header) => (
              <th key={header.id}>
                {flexRender(
                  header.column.columnDef.header,
                  header.getContext()
                )}
              </th>
            ))}
          </tr>
        ))}
      </thead>
      <tbody>
        {table.getRowModel().rows.map((row) => (
          <tr key={row.id}>
            {row.getVisibleCells().map((cell) => (
              <td key={cell.id}>
                {flexRender(
                  cell.column.columnDef.cell,
                  cell.getContext()
                )}
              </td>
            ))}
          </tr>
        ))}
      </tbody>
  );
}
With the help of column definitions, React Table knows how to fetch data for a cell and transform it as needed. You only need to focus on properly laying the table out.
What's cool about React Table is that you don't need to flatten the nested query result into tabular form. The columns can be defined to reach into deeply nested objects.
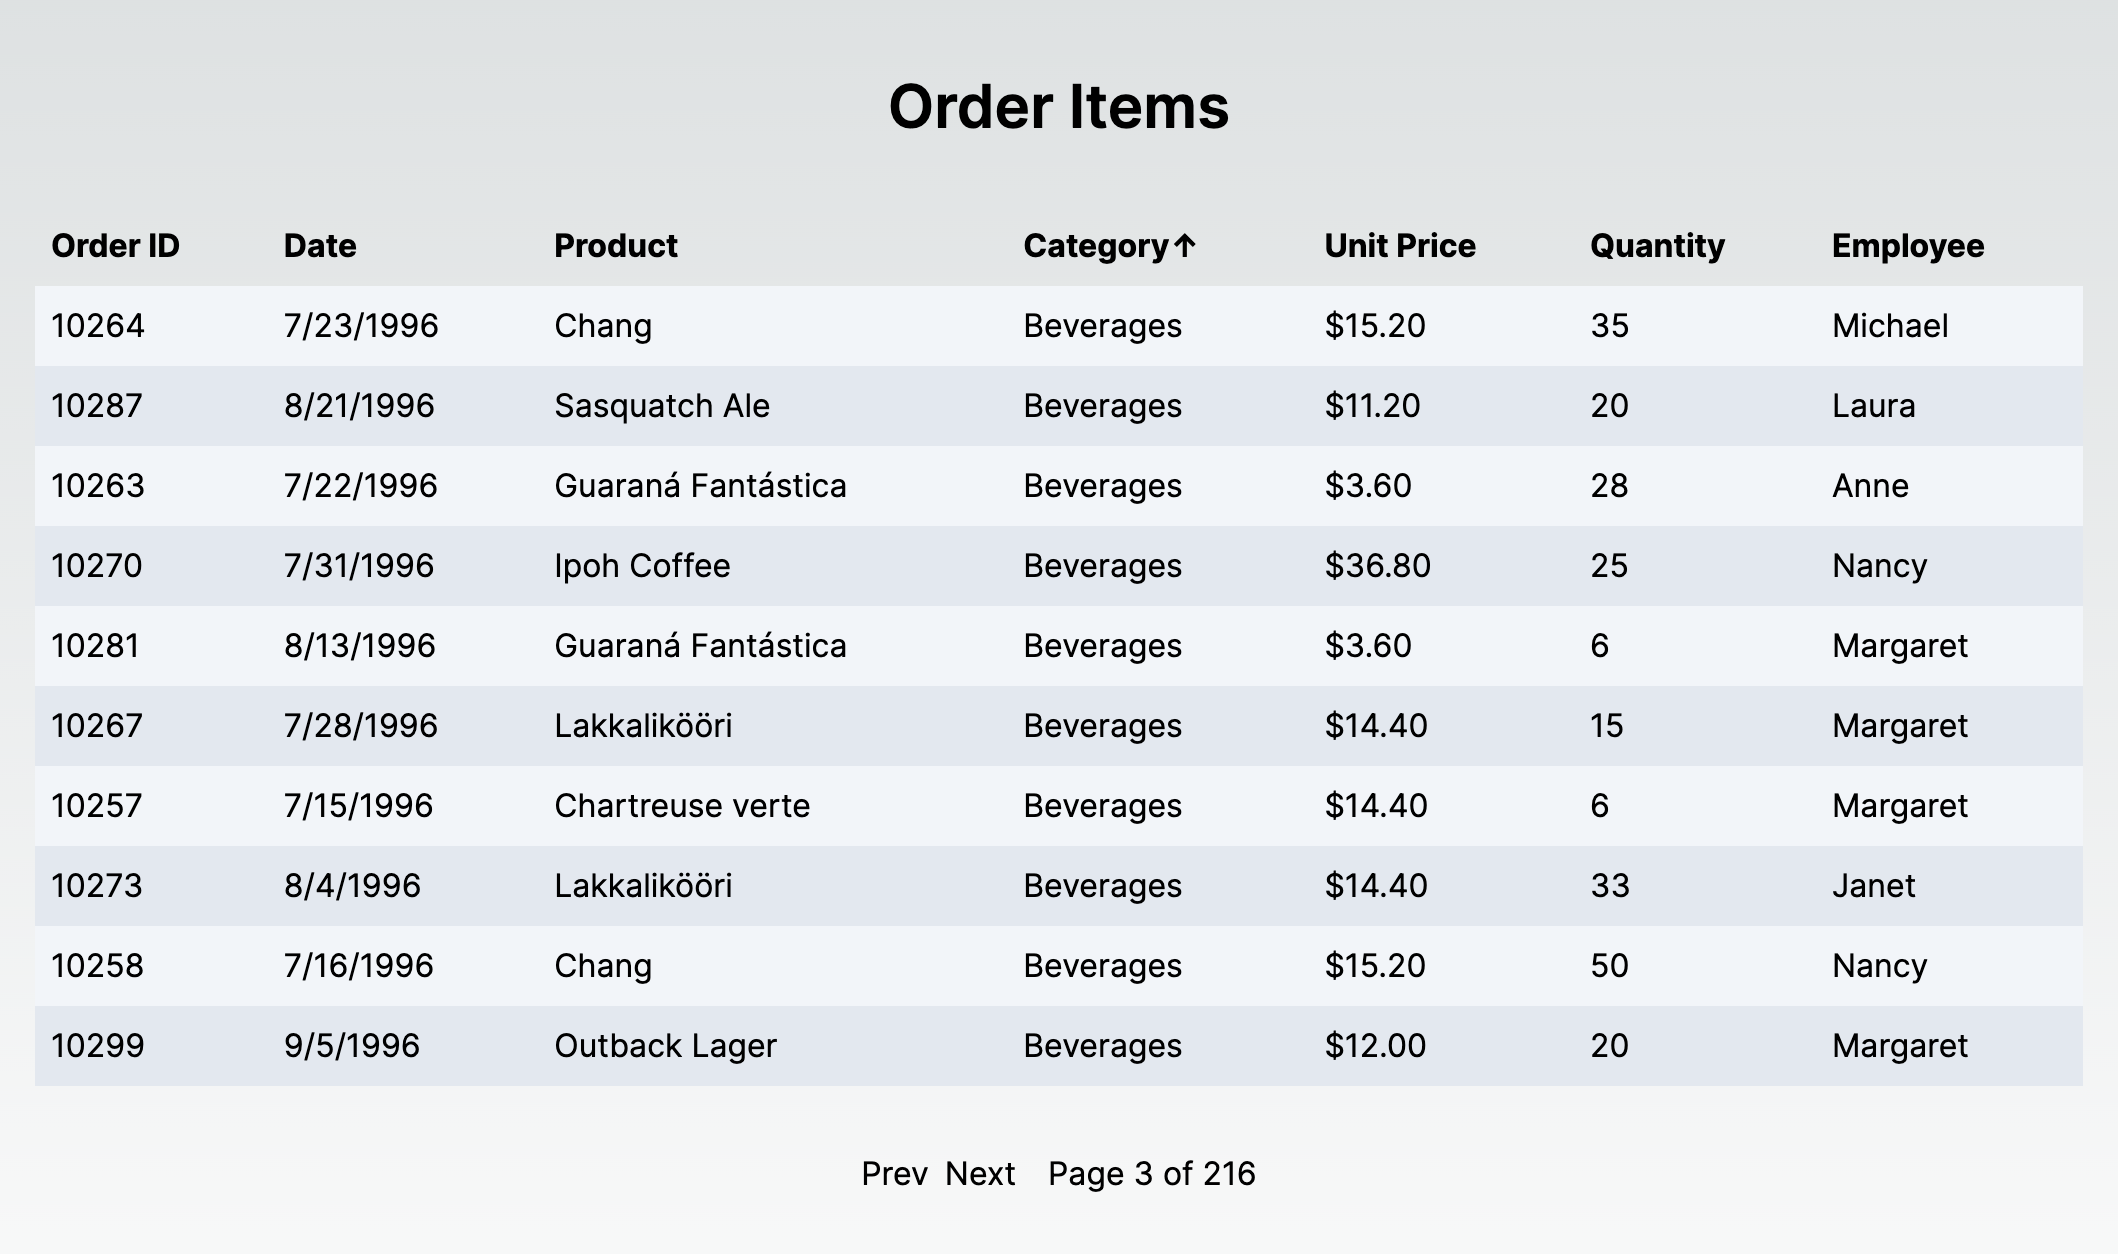
Making it fancier
Tables allow you to do many things besides viewing data. Let's use pagination as an example to demonstrate how to enable such interaction in our setup.
React Query has built-in support from front-end pagination. However, since we're rendering database tables, we want the pagination to run at the backend. First, we define a pagination state and set the table to use manual pagination mode (meaning that we handle the pagination ourselves):
// pagination state
const [pagination, setPagination] = useState<PaginationState>({
  pageIndex: 0,
  pageSize: PAGE_SIZE,
});

// fetch total row count
const { data: count } = useCountOrderDetail();

const table = useReactTable({
  ...

  // pagination
  manualPagination: true,
  onPaginationChange: setPagination,
  pageCount: Math.ceil((count ?? 0) / PAGE_SIZE),

  // state
  state: { agination },
});
Also, update the hooks call to respect the pagination state:
const { data } = useFindManyOrderDetail({
  ...queryInclude,
  skip: pagination.pageIndex * pagination.pageSize,
  take: pagination.pageSize,
});
Finally, add navigation buttons:
<div>
  <button onClick={() => table.previousPage()} disabled={!table.getCanPreviousPage()}>
    Prev
  </button>
  <button onClick={() => table.nextPage()} disabled={!table.getCanNextPage()}>
    Next
  </button>
  <span className="ml-2">
    Page {table.getState().pagination.pageIndex + 1} of{' '}
    {table.getPageCount().toLocaleString()}
  </span>
</div>
This part well demonstrates the value of "headless" UI. You don't need to manage detailed pagination state anymore. Instead, provide the bare minimum logic and let React Table handle the rest. Sorting can be implemented similarly. Check out the link at the end of this post for the complete code.
Tons of flexibility
We've got a pretty cool table end-to-end working now, with roughly 200 lines of code. Less code is only one of the benefits of this combination. It also provides excellent flexibility in every layer of the stack:
-
Prisma's query
Prisma is known for its concise yet powerful query API. It allows you to do complex joins and aggregations without writing SQL. In our example, our table shows data from five tables, and we barely noticed the complexity.
-
ZenStack's access control
Remember I said we'll get back to the security issue? A real-world API must have an authorization mechanism with it. ZenStack's real power lies in its ability to define access control rules in the data schema. You can define rules like rejecting anonymous users or showing only the orders of the current login employee, etc. Read more details here.
-
React Query's fetching
React Query provides great flexibility around how data is fetched, cached, and invalidated. Leverage its power to build a highly responsive UI and reduce the load on the database at same time.
-
React Table's state management
React Table has every aspect of a table's state organized for you. It provides a solid pattern to follow without limiting how you render the table UI.
Conclusion
The evolution of dev tools is like a pendulum swinging backward and forward between simplicity and flexibility. All these years of wisdom have distilled into awesome tools like React Table and React Query, which seem to have found a good balance. They are not the simplest to pick up, but they are simple enough yet wonderfully flexible.
The complete sample code: https://github.com/ymc9/react-query-table-zenstack